PhotobucketHomeHomeHomeHomeHome
PhotobucketPhotobucketPhotobucketPhotobucket

Liam's First Holy Communion Dessert Table

Last weekend, we had the pride and privilege to share our eldest son Liam's First Holy Communion.   It is such a special religious milestone, and we brimmed with pride at our young man.

We wanted a small but special celebration and decided to invite our very nearest and dearest family and friends to celebrate with us at home after the church service.

When thinking about themes, because that is what I do, I wanted something symbolic but not overtly religious.   I toyed around with using patterns and colours as a theme and then I thought of stained glass windows - no more symbolic than that!

Onto the invitations and of course Nicole at Pretty and Print knew what I wanted immediately and her papery were nothing short of spectacular.    I boxed up with the invitations and they were a simple and elegant start to our event.

Onto desserts!   Stained glass theme needs to have a stained glass cake and desserts.   That was easy enough to think through, but I wanted to match that with lots of crisp white.  For the backdrop, I went backwards and forwards with many different ideas - but while chatting with my design buddy, we came up with "string art".   That took me way back to school.    So with a big bit of MDF, some nails and a hammer and different coloured string - the backdrop was made and I LOVED, LOVED, LOVED it!   It was the perfect silhouette for the table.

Always trying to find a DIY project or trying my hand at my own thing, I wanted to make some of my own risers and cake plates.    The main riser at the back of the table is a long wood piece that I added some decorative wood feet to each end and painted white.   The rectangle cake plates at the front of the table were made in the same way.    This way I could design my own table and design the tableware around my thoughts.   

The green cake stands on each side are simple white candle sticks from IKEA with wooden circles secured on top and then painted in my lime green colour.   All of it came together to make the clean look of the table that I wanted.   My table was not a huge table and I needed to utilise my space and I did not want it cluttered at all.   My riser at the back was used as the display piece for the coloured candy in my design colours.    All the candy was supplied by Leanne at Sweet Style.    No fancy glass candy jars here, just plain tall drinking glasses.


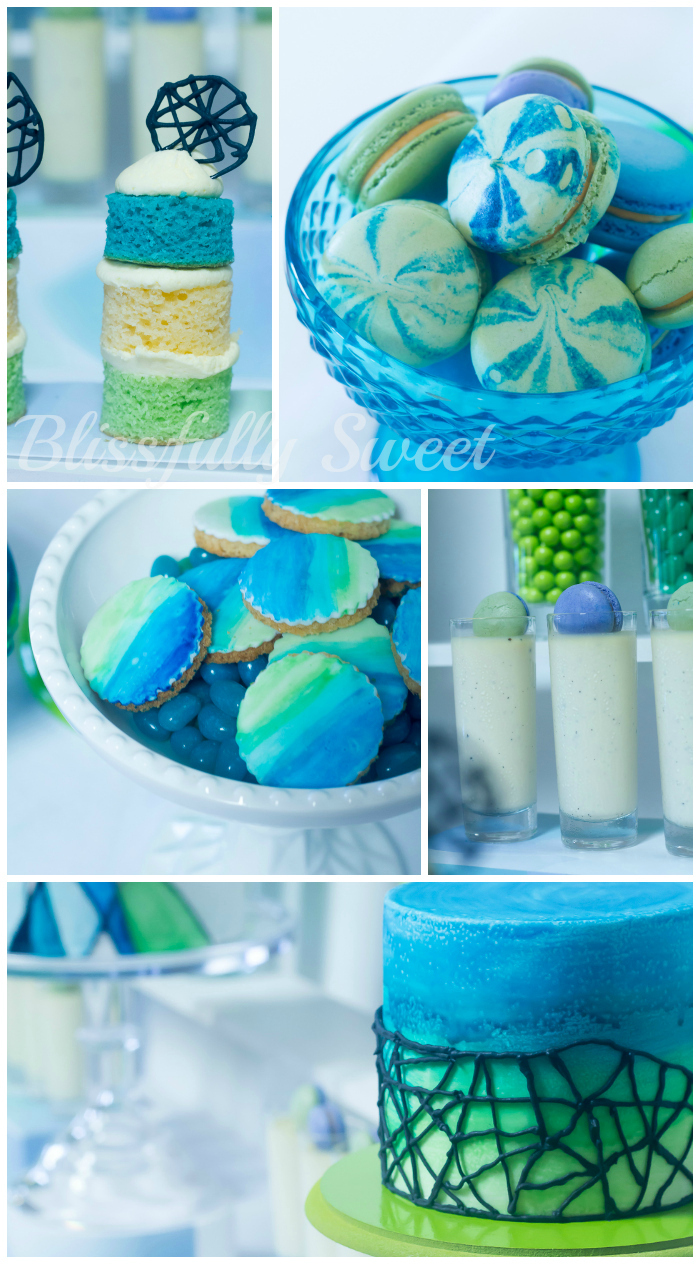
Then onto the actual sweets for the sweet table.    The cake – I wanted to make a stained glass effect cake and WOW I loved how it looked.   The  black lines were all piped on in their various lines and then all the windows were hand painted in different shades of the design colours.   This was the perfect centrepiece for the table.   I wanted to have a simple and uncomplicated array of coordinated desserts.   Handpainted watercolour cookies were a colourful addition and the marbled macarons were sensational.   The macarons were made by the macaron goddess Its a Cake by Jhoanee.   Layered and coloured petit cakes stood at the front of the table and were topped with royal icing stained glass disks.   Then the only other desserts were pannacotta shots topped with mini macarons. 


Lastly, our celebration was a small family and friends affair and this allowed for small and intimate table arrangements for the guests.    Flowers for each table were the centrepiece and arrangements of blue hydrangeas and baby hydrangeas were natural looking and bought colour to the table.    Little glass jars filled with little flower buds completed the table flowers.    I included the printables into our table setting in the form of placemats for everyone.    I loved how these set off the blue china perfectly.


All in all, we had a beautiful day with our nearest and dearest.   It was a day filled with laughter and love and joy at seeing our boy become a young man.

Please enjoy these images and a little glimpse into our special day!

My boy Liam.    He was actually quite sick in the lead up to this day and was not at all himself.

Sharing the day with so many wonderful people that we are privileged to share our life with.


Gorgeous invitations by Pretty & Print

Table settings.   Lots of fresh flowers, coloured glass and printed placemats by Pretty & Print made the perfect table scape.

 
Love my placemats!


Stained glass dessert table.

String art backdrop made by me.
All desserts by me.   Macarons by Its a Cake Thing by Jhoanee


Coloured candies by Sweet Style.


Even the inside of the cake was colour coordinated.


I hope you enjoyed this little look into our special day.

Cake, sweets, tableware, styling and photography by Blissfully Sweet
Papery by Pretty & Print
Macarons by Its a Cake Thing by Jhoanee
Candy, Milk glass cake stand and white compotes by Sweet Style.

{Recipe} Mascarpone, Mango & Hazelnut Tart

It is now coming into the warmer months and hooray, we are welcoming all our summer fruits.  Nothing screams summer to me more than days at the beach followed by sticky hands and arms after sucking all the goodness out of a box of mangoes!

An impromptu family BBQ last weekend had me at the shops that morning and wondering what I could make for something sweet.   Mangoes were in my trolley and as I walked down the dairy aisle, mascarpone soon joined the mangoes.   Seeing these two now best buddies sitting side by side in my trolley, I knew what I wanted to make for dessert.   A few more ingredients and homeward bound we were.

My grand plan for dessert was for an open tart of stacked rectangles of puff pastry that was layered with a mascarpone cream and then slathered in juliennes of fresh mangoes and if you know me, you know I love texture, some chopped freshly roasted hazelnuts also.

Lots of ooohs and aaahs when I bought out dessert and I was pretty impressed with myself.  So I took a couple of happy snaps and onto the cutting.   Needless to say - this dessert ate MUCH better than it was plated!   Trying to cut through the puff pastry as well as the fresh mascarpone was not a pretty plating experience for the guests, however this was not their concern, as soon enough their faces were dipped firmly into the tart!

The next day, there was a smidgeon left over {gasp!}    I left this last vestige of the dessert for my hubby (such a caring wife) for an after dinner treat.  Being the nice hubby he is, he allowed me to take a piece off the corner ;P!   I was happy to note that the next day, the tart was even a little better (if possible) than the day before and MUCH easier to serve.  


So this had me thinking then.   Did I really want to have to go through the plating scenario again if I had a dinner party?    The mission was set, time to get the mini tart pan out.

HUGE success!   If I had a choice between the two, I would pick the mini one probably.   Only because that I love everything in mini and also that in my mind the minis have less calories!


ummm yep, that was the taste testing bite!


Surprise, surprise, I decided to go one step further!!!    Maybe it is the Italian family heritage or maybe it is the part in me that really loves a bit of savoury with my sweet, but some aged balsamic syrup was the perfect finishing note to these tarts.   You may not be like me, and not want that slight bitter tang, but believe me it is goooood!


So on that note, maybe I should leave you with this recipe!


Mascarpone, Mango & Hazelnut Tart/s

2 sheets of puff pastry cut into half (to make 2 rectangles)
OR
Shortcrust pastry mini tart cases (use your own pastry recipe or buy some good quality pre made ones)
500 gms tub of mascarpone cheese
1 cup icing sugar (sifted)
300mls thickened cream
1 fresh mango, cut into juliennes
1/2 cup freshly roasted hazelnuts, lightly chopped
Aged balsamic glaze (if desired)

**These quantities suit the puff pastry open tart option.   You may want to quarter the size of the filling ingredients when making the mini tarts.   But the mascarpone mix can be made and then stored in the fridge for 3 days.  To use again, just quickly rewhip and use as a topping for a cake, filling for cannoli etc etc.

Puff pastry option
Place the puff pastry rectangles on baking paper in an oven at 160oC for 10-15 minutes.   After 10 minutes take out of the oven and very carefully using an oven mitt, press the rising puff pastry back down and then put back into the oven for another 5 minutes or until slightly golden.

To make the mascarpone mix, in your mix master whip the mascarpone until fluffy and slowly add your icing sugar until incorporated and then whip until nice and fluffy.   In a separate dish, whip your thickened cream until it has soft peaks and then gently mix the cream into the mascarpone mix.

Let the pastry cool completely and assemble your layers of mascarpone, mango and hazelnuts.

Lightly drizzle over your balsamic glaze as desired - remember a little goes a long way.

Refrigerate until serving.

Mini- Tart Option
Make the mascarpone mix as above.   Assemble your short crust pastry shells on your serving dish and then pipe (or spoon) a generous dollop of the mascarpone into each shell.   Top with then juliennes of mango and sprinkle with the crushed hazelnuts.

Drizzle over your balsamic glaze and refrigerate until serving.

It is hard to say how many tarts this way make as each tart case is made differently - but the mix should be enough for 2 dozen mini tarts.


I hope you enjoy this recipe.   Such an easy option for a dessert tasting plate at your next entertaining event.

xx


Ruffled Blooms & Rocking Horse Christening Cake


Beautiful little Siena-Rose celebrated the Christening day today and this ruffley number took centre stage on the cake table.


Siena's mum loved my previous "Isla" cake but we made a few changes. The bottom extended tier was covered in an ombre of pink ruffled blooms and the top tier was given a shiny lustre treatment. The little handmade rocking horse sat a top the entire creation.

All decorations are handmade by myself and completely edible.

The bottom tier is vanilla with raspberry swirl cake with white chocolate ganache and the top tier is vanilla/chocolate marble cake with dark chocolate ganache.

The celebration lunch was held at the gorgeous Pappardellerestaurant in Haberfield. For those of you in Sydney - you may remember Joe from Stars at Gigis. He was a mainstay on the Darling Street strip for many, many years. Pappardelle is his new venture and I cannot wait to get there myself to eat his wonderful food once again!


May God Always Bless You Siena-Rose!
x


Orange Buttercream Ruffle Cake


Maria ordered this little ruffled beauty for her daughter's astronaut themed birthday today. It really is a mini cake in size, only 5", but there is a lot of yumminess crammed into this small package!


The cake is strawberry/vanilla swirl cake filled, covered and ruffled into decadent vibrant orange buttercream.


Happy Birthday !


Tool Box Birthday Cake


This cake was made for an extra special person! John, my old next door neighbour, feels like a part of our family also. When I was asked to make a cake for his 60th, I automatically thought of a tool box - because he is the handiest handy man around! He is oft times off doing odd jobs for me when the time arises and he is the salt of the earth! Cannot speak highly enough of this family!


So onto the cake. I wanted the actual tool box, to have a vintage wood feel to it. All the panels and cross bar were given a hand painted wood look to achieve this. Then there were the tools .... I started and kept going! The oily rag on the side of the box was a last minute addition, as well as the crumbled up paper as the birthday message.


The cake is chocolate mud cake with dark chocolate ganache. Everything is completely hand moulded by me and completely edible, except the cross bar, which is fondant covered styrofoam.


Every handy man needs a tape measure

The crumpled up paper as the birthday message was a last minute addition.

Nuts, bolts and screwdriver

I am bad with the right names - a shifter (?), hammer and pliers.

More nuts & bolts as well as a phillips head screwdriver and paint scraper.

Even an oily rag made its way into the tool box.

A couple of spanners.

Ready for any handy job required.


Happy 60th Birthday John!
x


Money, Money, Money Themed Cakes & Treats


This cake and treats were made as centrepieces for a money, money, money themed table styled by the fabulous Events By Nat.


Natalie always has wonderfully creative ideas and this table was made for her sister's birthday. Her sis is a financial planner and this was such an appropriate theme for her.

Nat gave me the brief and told me just to make up some treats please and a cake!

First order was the cake. I knew that Nat's backdrop would be amazing, so kept the cake design minimal and clean. The bottom extended tier is simply covered in an edible image. The fantastic dollar design image was created by Nicole at Pretty and Print. The top tier I focussed on gold and gold coins. Gold circle outlines covered the entire tier and it was all given a golden lustre treatment. I decided on the black dollar sign at the last moment.

The black milk glass cake stand is by Sweet Style.

The table was today featured on the Amy Atlas Events blog - see the link below:


The cake and sweet treats


Dollar note cookies

Money themed cupcakes

Golden bullion marshmallows


and the stunning table created by Events by Nat.   I love Nat's attention to detail and that backdrop is OMG creative!

Thanks
x


LinkWithin

Related Posts with Thumbnails